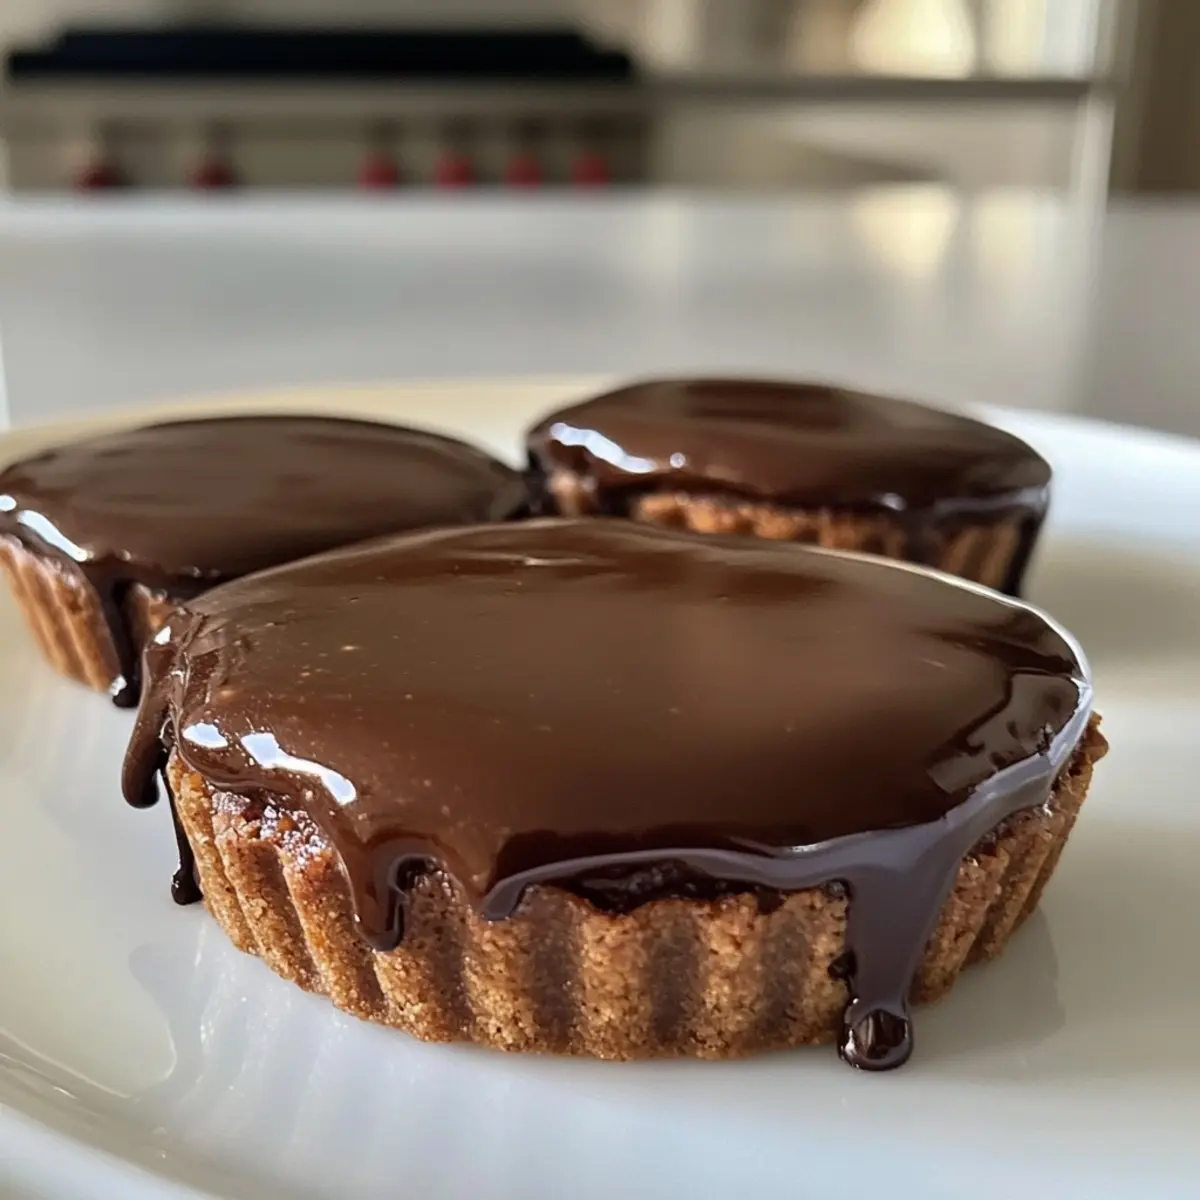
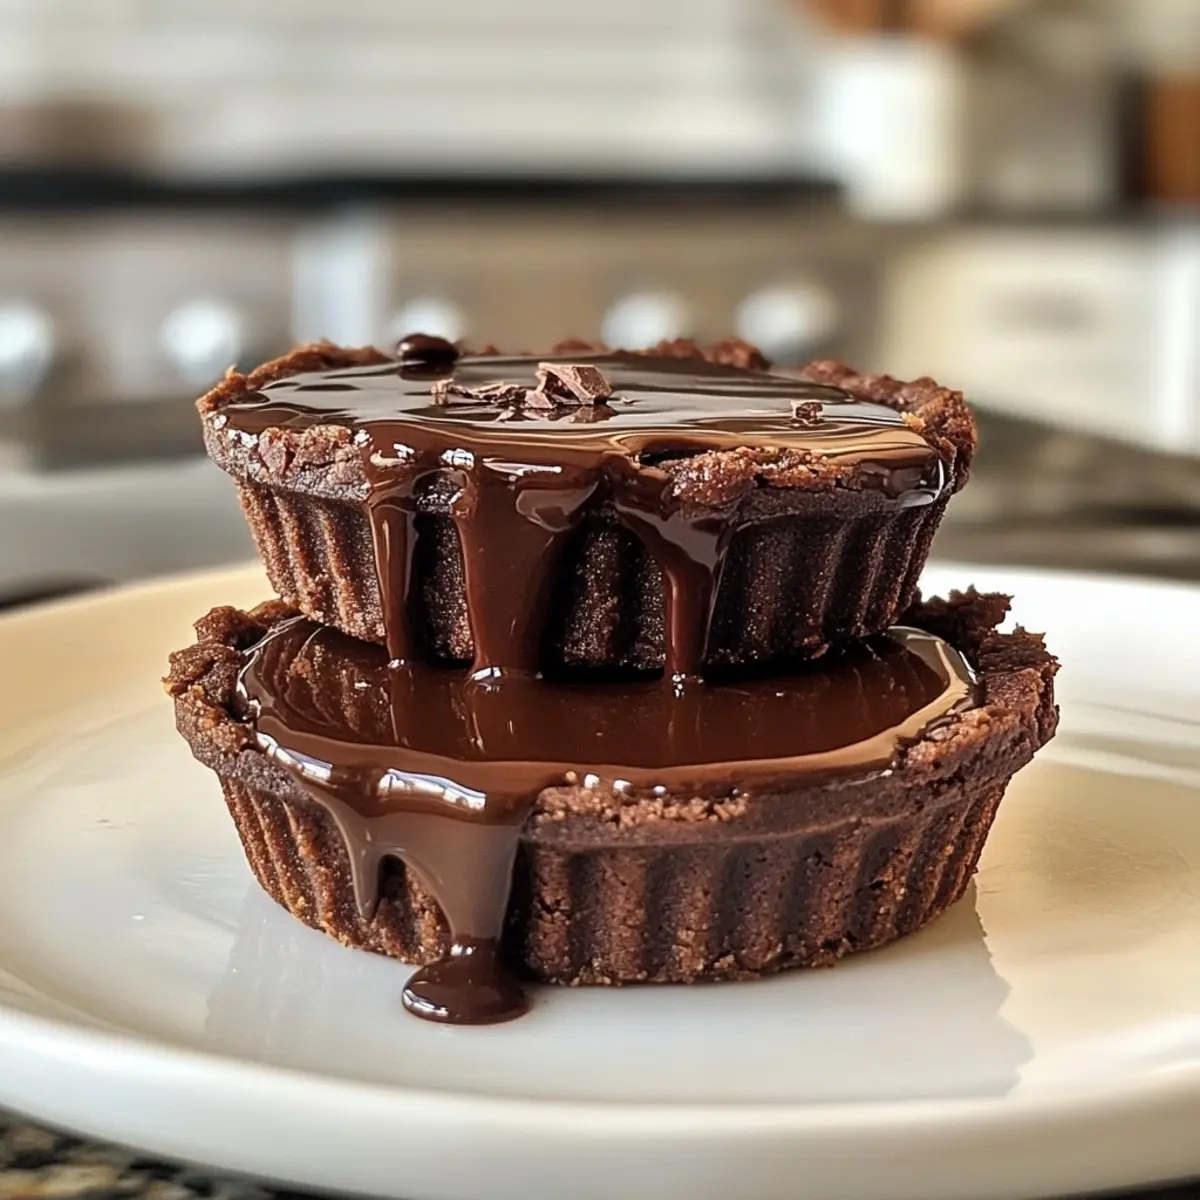
There’s something incredibly soothing about the simple act of baking, especially when it involves chocolate. As I prepared to whip up my latest indulgence, the delightful scent of chocolate wafting through the air had me envisioning cozy gatherings with friends and family. This Decadent Mini Chocolate Tart with Flaky Crust is more than just a dessert; it’s an experience that transforms any occasion into a sweet celebration.
Picture this: each mini tart boasts a buttery, flaky crust that crumbles perfectly as you take a bite, revealing a rich, velvety chocolate filling that sings in harmony with every forkful. Whether you’re hosting an elegant dinner party or simply enjoying a quiet evening at home, this dessert is sure to elevate your culinary repertoire. Plus, its versatility allows you to play with toppings and chocolate types, making it a truly adaptable treat.
Join me as I guide you through this easy-to-master recipe that promises not only to satisfy your sweet tooth but also to impress everyone at your table. Let’s dive into this chocolatey delight that’s ready to steal the show!
Why You’ll Love This Irresistible Dessert
Decadent flavors: Experience the rich taste of high-quality dark chocolate perfectly balanced with a flaky, buttery crust.
Simple preparation: This tart is easy to make, requiring just a few basic steps that even novice bakers can master.
Versatile options: Switch up the chocolate types or get creative with toppings like fresh berries or whipped cream for a personalized touch.
Crowd-pleasing treat: Ideal for both parties and family gatherings, this tart will impress your guests and become the highlight of any dessert table.
Time-saving: Prepare in advance and simply chill until ready to serve, making it a hassle-free addition to your menu.
Try it alongside our delightful Coconut Milk Bliss for a complete experience!
Irresistible Mini Chocolate Tart Ingredients
For the Crust
• All-Purpose Flour – Provides structure and support to the crust; sift for a finer texture.
• Cocoa Powder – Adds rich chocolate flavor; opt for Dutch-processed for a smoother taste.
• Unsalted Butter – Delivers a flaky texture when used cold; ensure it’s chilled before using.
• Granulated Sugar – Sweetens the crust; adjust according to your sweet preference.
• Salt – Enhances flavors; a pinch goes a long way to balance the sweetness.
For the Filling
• Dark Chocolate – The essence of the filling; choose high-quality chocolate for a richer flavor profile in your irresistible Mini Chocolate Tart.
• Heavy Cream – Creates a luscious, creamy filling; use full-fat for best results.
• Eggs – Contributes richness and helps set the filling; fresh eggs are ideal for optimal texture.
• Salt – Just a pinch enhances and balances the rich chocolate flavor.
Optional Toppings
• Fresh Berries – Adds a burst of freshness and color to your tart; strawberries or raspberries pair beautifully.
• Whipped Cream – Adds a light, airy contrast to the rich filling; for an extra treat, sweeten with vanilla.
• Sea Salt – A light sprinkle enhances the chocolate flavor, providing a delightful contrast.
• Espresso Powder – Incorporate for an added depth of flavor, complementing the chocolate beautifully.
How to Make Irresistible Mini Chocolate Tart
-
Prepare Crust: In a bowl, combine all-purpose flour, cocoa powder, granulated sugar, and salt. Cut in the cold unsalted butter until the mixture resembles coarse crumbs. Gradually add cold water until the dough holds together, then roll out and press into mini tart pans. Prick the bottoms and refrigerate until firm.
-
Bake Crust: Preheat your oven to 350°F (175°C). Bake the tart shells for about 15 minutes, until they feel firm but not browned. Let them cool completely before the next step.
-
Make Filling: Heat heavy cream in a saucepan over medium heat until just simmering. Remove from heat and pour over chopped dark chocolate. Let sit for 2 minutes, then stir until the mixture is smooth and glossy.
-
Combine: In a separate bowl, whisk the eggs. Slowly incorporate the warm chocolate mixture into the eggs, whisking continuously to avoid cooking the eggs.
-
Fill Tarts: Pour the luscious chocolate filling into the cooled tart shells. Bake the filled tarts for an additional 10-12 minutes, until they are slightly set but still have a gentle jiggle in the center.
-
Cool & Serve: Allow the mini tarts to cool completely at room temperature before serving.
Optional: Top with fresh berries for a delightful burst of flavor.
Exact quantities are listed in the recipe card below.
What to Serve with Mini Chocolate Tart?
Elevate your dessert experience by pairing this rich chocolate treat with delightful accompaniments that complement its luscious flavor.
-
Fresh Berries: A medley of strawberries, raspberries, and blueberries adds a tart contrast, balancing the sweetness of the chocolate.
-
Whipped Cream: A dollop of lightly sweetened whipped cream provides a fluffy, airy contrast, enhancing each bite of the creamy tart.
-
Vanilla Ice Cream: Serving the tart warm with a scoop of vanilla ice cream creates a delicious temperature contrast, making every forkful even more indulgent.
-
Espresso: A shot of rich espresso or coffee serves as a perfect palate cleanser, enhancing the chocolate flavors while providing a bold kick.
-
Mint Leaves: A sprinkle of fresh mint on top not only brightens the presentation but also adds a refreshing herbal note that complements the chocolate.
-
Chocolate Sauce: Drizzling warm chocolate sauce over the tart amplifies its decadence, creating an extra layer of chocolatey delight that chocolate lovers will adore.
-
Sea Salt: A tiny pinch of flaky sea salt on top accentuates the sweetness of the filling, creating a mouthwatering contrast that highlights the flavors.
-
Hazelnut Praline: Chopped hazelnuts or a hazelnut praline adds a delightful crunch and nutty flavor, enriching the overall dessert experience.
-
Sweet Wine: Pair with a glass of dessert wine, such as port or late harvest Riesling, to balance the richness and elevate the meal to a new level.
How to Store and Freeze Mini Chocolate Tart
Room Temperature: Enjoy leftover tarts at room temperature for up to 2 hours after serving. This allows the rich flavors to shine.
Fridge: Store any uneaten tarts in an airtight container in the refrigerator for up to 3 days. Keep chilled to maintain freshness and flavor.
Freezer: For longer storage, freeze unfilled tart shells in an airtight container or wrap tightly in plastic wrap for up to 2 months. Thaw in the fridge before filling.
Reheating: To enjoy leftover filled Mini Chocolate Tarts, gently warm in a 300°F (150°C) oven for 10-15 minutes until just heated through.
Make Ahead Options
These Irresistible Mini Chocolate Tarts are perfect for busy home cooks looking to save time while impressing guests! You can prepare the tart crust up to 24 hours in advance. Simply follow the crust instructions, bake it, and allow it to cool completely before storing in an airtight container in the refrigerator. The chocolate filling can also be made ahead; refrigerate it for up to 3 days in a sealed container. When you’re ready to enjoy, pour the filling into the crust and bake as directed. This way, you maintain the tart’s delicious, flaky texture and rich flavor, ensuring a delightful dessert with minimal effort!
Variations & Substitutions
Feel free to get creative with this recipe—there are so many delightful twists you can explore!
- Chocolate Type: Swap dark chocolate for milk or white chocolate to change the dessert’s sweetness and richness.
- Nutty Delight: Stir in some finely chopped nuts into the chocolate filling for a delightful crunch and earthy flavor. Almonds or hazelnuts work beautifully!
- Dairy-Free: Use coconut cream instead of heavy cream and a dairy-free chocolate for an entirely dairy-free version.
- Fruit Fusion: Top with fresh cherries or orange zest to complement the chocolate richness with a refreshing twist.
- Espresso Infusion: Add a teaspoon of espresso powder to the chocolate mixture to intensify the chocolate flavor and create a mocha experience.
- Spicy Kick: Sprinkle some chili powder or cayenne pepper into the chocolate filling for a surprising burst of heat that plays beautifully against the sweetness.
- Minty Fresh: Incorporate a few drops of peppermint extract into the filling for a refreshing mint chocolate variation. A delightful holiday twist!
- Caramel Drizzle: Drizzle homemade or store-bought caramel over the tarts before serving for a luxurious touch that elevates every bite.
With each variation, you bring your personal touch to the table—enjoy the process and taste the love you put into your baking!
Expert Tips for Irresistible Mini Chocolate Tart
-
Quality Matters: Use high-quality dark chocolate for your filling; it’s the heart of your irresistible Mini Chocolate Tart. Avoid using lower quality, as it can affect the overall flavor.
-
Cold Ingredients: Ensure your butter is nice and cold before cutting it into the crust mixture; this is key for achieving that flaky texture you desire.
-
Whisk Carefully: When combining the warm chocolate mixture with eggs, pour it in gradually while whisking continuously to prevent those pesky scrambled eggs from forming.
-
Chilling is Crucial: Don’t skip refrigerating the crust before baking; this step enhances the flakiness and prevents shrinking during baking.
-
Don’t Overbake: Keep an eye on the filling while it bakes. It’s done when it appears set with a slight jiggle in the center, resulting in a perfect creamy consistency.
Mini Chocolate Tart Recipe FAQs
What chocolate should I use for the filling?
Absolutely! For the best flavor in your irresistible Mini Chocolate Tart, I recommend using high-quality dark chocolate with at least 60% cocoa content. This will create a rich filling that perfectly balances the sweetness of the crust. If you prefer a milder taste, feel free to experiment with milk chocolate or even white chocolate, keeping in mind that it will alter the overall flavor profile.
How should I store leftover tarts?
Very! After using the tarts, store any leftovers in an airtight container in the refrigerator for up to 3 days. This keeps the crust fresh and maintains the rich flavor of the filling. You can enjoy them chilled or allow them to come to room temperature before serving for a slightly different experience.
Can I freeze Mini Chocolate Tart?
Of course! To freeze, place unfilled tart shells in an airtight container or wrap them tightly with plastic wrap. They can be stored in the freezer for up to 2 months. When you’re ready to use them, simply thaw in the refrigerator overnight. Once thawed, bake them briefly before filling them with your chocolate mixture.
What should I do if my chocolate filling is lumpy?
Not to worry! If you find your filling has lumps, you might have poured the chocolate into the warm cream too quickly or didn’t stir well enough. To fix it, pour the mixture back into a saucepan, and gently heat over low heat, stirring constantly until it’s smooth. If necessary, strain through a fine mesh sieve to ensure a silky texture.
Are there any dietary considerations for this recipe?
Definitely! If you’re making this dessert for someone with dietary restrictions, you can substitute ingredients. For a gluten-free version, use a gluten-free flour blend in place of all-purpose flour. If dairy is a concern, simply swap cow’s milk chocolate and heavy cream for dairy-free alternatives available in stores. Always check labels for allergens!
How can I tell if my tarts are done baking?
Great question! When baking the filled Mini Chocolate Tarts, look for a slight jiggle in the center when done; they should be set around the edges but still soft in the middle. If you see that slight wobble, they’re ready to come out of the oven! This indicates a creamy filling, perfect for those delicious bites!
Irresistible Decadent Mini Chocolate Tart Recipe You'll Love
Equipment
- mixing bowl
- Tart Pans
- Saucepan
- Whisk
Ingredients
For the Crust
- 1 cup All-Purpose Flour Sift for a finer texture
- 1/4 cup Cocoa Powder Opt for Dutch-processed
- 1/2 cup Unsalted Butter Chilled before using
- 1/4 cup Granulated Sugar Adjust for sweetness
- 1/4 teaspoon Salt Enhances flavors
For the Filling
- 8 ounces Dark Chocolate Choose high-quality
- 1 cup Heavy Cream Use full-fat for best results
- 2 large Eggs Fresh eggs are ideal
- 1/8 teaspoon Salt Enhances chocolate flavor
Optional Toppings
- 1/2 cup Fresh Berries Strawberries or raspberries
- 1 cup Whipped Cream Sweeten with vanilla for extra flavor
- 1/4 teaspoon Sea Salt Enhances chocolate flavor
- 1 teaspoon Espresso Powder For added depth of flavor
Instructions
Crust Preparation
- In a bowl, combine all-purpose flour, cocoa powder, granulated sugar, and salt. Cut in the cold unsalted butter until the mixture resembles coarse crumbs. Gradually add cold water until the dough holds together, then roll out and press into mini tart pans. Prick the bottoms and refrigerate until firm.
- Preheat your oven to 350°F (175°C). Bake the tart shells for about 15 minutes, until they feel firm but not browned. Let them cool completely.
Filling Preparation
- Heat heavy cream in a saucepan over medium heat until just simmering. Remove from heat and pour over chopped dark chocolate. Let sit for 2 minutes, then stir until the mixture is smooth and glossy.
- In a separate bowl, whisk the eggs. Slowly incorporate the warm chocolate mixture into the eggs, whisking continuously to avoid cooking the eggs.
- Pour the luscious chocolate filling into the cooled tart shells. Bake the filled tarts for an additional 10-12 minutes, until they are slightly set but still have a gentle jiggle in the center.
- Allow the mini tarts to cool completely at room temperature before serving.
Leave a Comment