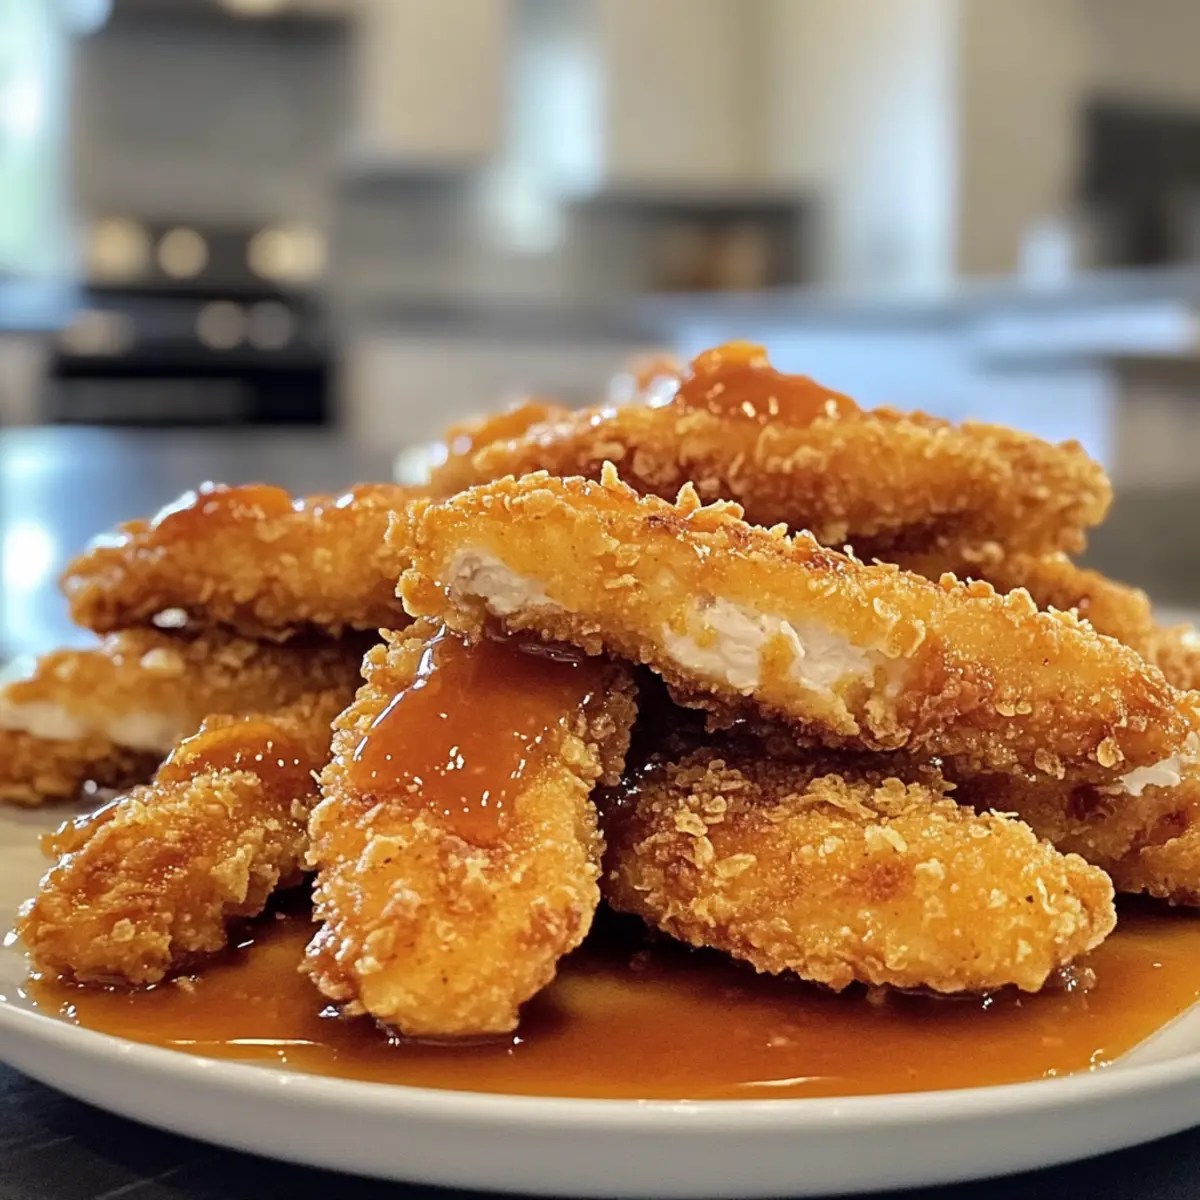
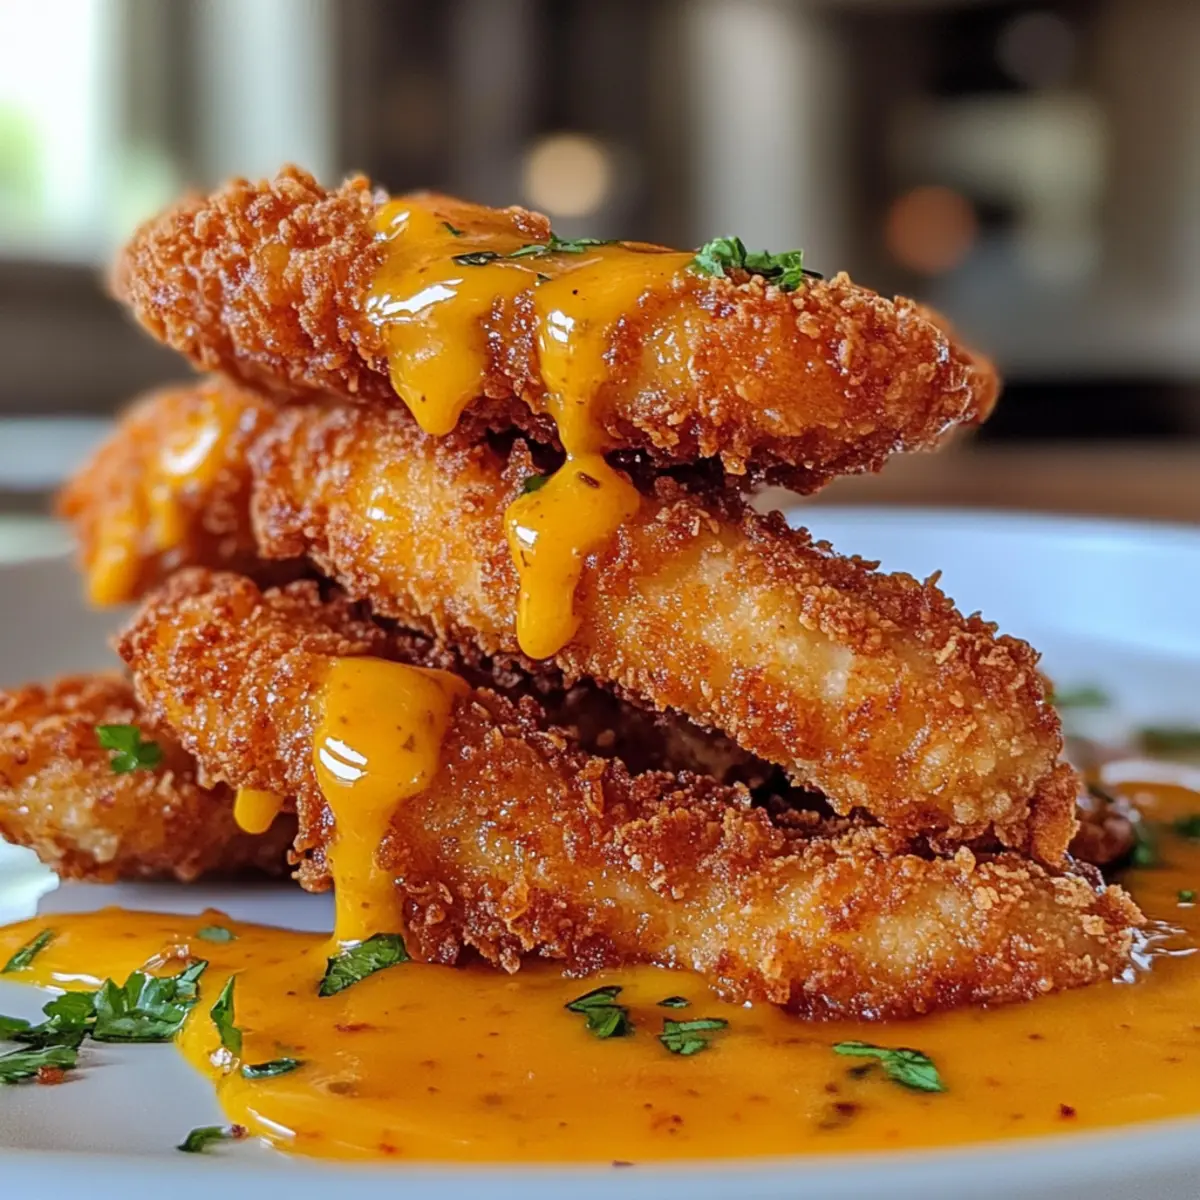
There’s something undeniably satisfying about the crunch of a perfectly cooked chicken finger. As the warm, golden-brown strips sizzle in the pan, the irresistible aroma of garlic and paprika fills the kitchen, calling friends and family together for a feast. These Ultimate Crispy Chicken Fingers aren’t just another meal; they’re a celebration of comfort food that turns any gathering into a festive occasion.
After a week full of hectic schedules and endless takeout, I found myself craving something homemade and indulgent. I wanted to create a dish that reminded me of joyful game nights, bustling potlucks, and cozy evenings in. This recipe is a surefire way to elevate your weeknight dinner or to impress guests with ease. Best of all, you can customize them to your liking, whether by adding cheese or experimenting with different spices. Get ready to find your new favorite kitchen staple that’s sure to bring laughter and deliciousness to your table!
Why are Ultimate Crispy Chicken Fingers a must-try?
Irresistible Crunch: Achieve that satisfying crunch with a perfectly crisp coating, making each bite a delightful experience.
Flavor Explosion: Seasoned with garlic and paprika, these chicken fingers offer a savory burst of flavor that’s hard to resist.
Versatile Customization: Feel free to experiment with spices or cheeses, tailoring the recipe to your taste buds!
Quick & Easy: Whip these up in no time, perfect for weeknight dinners or spontaneous gatherings.
Crowd-Pleasing Delight: Loved by kids and adults alike, they’re a guaranteed hit for any occasion, just like these delicious Parmesan Chicken Skewers!
Ultimate Crispy Chicken Fingers Ingredients
For the Chicken Fingers
• Boneless, Skinless Chicken Breasts – The star of the dish; cut into strips for perfect bite-sized pieces.
• All-Purpose Flour – Creates a crunchy coating; sift before use for a lighter texture.
• Eggs – Helps bind the coating; beat two eggs to enhance adherence of breadcrumbs.
• Breadcrumbs – Use seasoned or panko for that irresistible crunch; panko is preferred for extra crispy texture.
• Salt and Pepper – Essential for enhancing flavor; adjust to your taste for the ultimate crispy chicken fingers.
• Garlic Powder – Adds a savory depth; feel free to increase if you love garlic.
• Paprika – Provides a delightful smokiness; consider smoked paprika for an extra flavor kick.
For Frying/Baking
• Cooking Oil – Choose your favorite, but olive oil adds a delicious twist while keeping it healthier.
Feel free to gather these ingredients and prepare to dive into a comforting culinary journey with these delicious Ultimate Crispy Chicken Fingers!
How to Make Ultimate Crispy Chicken Fingers
-
Prepare Chicken: Begin by cutting the boneless, skinless chicken breasts into strips about 1 inch wide. This ensures even cooking and a perfect bite every time.
-
Set Up Breading Station: Gather three bowls. Fill one with seasoned flour, the second with two beaten eggs, and the third with seasoned breadcrumbs. This organization makes coating a breeze.
-
Coat Chicken Strips: Take each chicken strip and first dip it into the flour, then the egg, and finally coat it thoroughly with breadcrumbs. Make sure every inch is covered to achieve maximum crunch.
-
Cooking Method:
- Frying: Heat oil in a skillet over medium-high heat. Fry each strip for about 3-4 minutes per side until they are golden brown and crispy.
- Baking: Preheat your oven to 400°F (200°C). Arrange coated chicken fingers on a baking sheet and bake for 20-25 minutes until they are crispy and cooked through.
- Resting: Once cooked, place the chicken fingers on paper towels to allow excess oil to drain. Serve them warm with your choice of dipping sauces for a delightful experience.
Optional: Serve with your favorite dipping sauces like ranch or honey mustard for a flavor boost!
Exact quantities are listed in the recipe card below.
Expert Tips for Ultimate Crispy Chicken Fingers
-
Pat Chicken Dry: Ensure chicken strips are patted dry before breading to help the coating stick better, resulting in deliciously crispy chicken fingers.
-
Breadcrumb Choices: Use panko breadcrumbs for an extra crunch. Don’t skip this detail; it truly elevates the texture of your chicken fingers.
-
Avoid Overcrowding: When frying, don’t overcrowd the pan. This allows each chicken strip to cook evenly and ensures they get perfectly crispy without steaming.
-
Temperature Matters: Use a cooking thermometer to maintain oil temperature. If it’s too hot, the outside burns before the inside cooks through; if too cool, you’ll miss that ultimate crispiness.
-
Experiment with Flavors: Play around with spices or even add grated cheese to the breadcrumb mixture. Tailoring the recipe keeps it fresh and exciting every time you make these chicken fingers!
What to Serve with Ultimate Crispy Chicken Fingers?
Creating a delightful meal around these golden chicken fingers will elevate your dining experience to new heights.
-
Creamy Coleslaw: The cool, crunchy texture of coleslaw provides a refreshing contrast that complements the warm, crispy chicken fingers. This classic pairing adds a delightful crunch and tanginess that brightens every bite.
-
Homemade Ranch Dip: A savory ranch dip enhances the flavors of the chicken fingers and brings an irresistible creaminess that will have everyone coming back for more. Perfect for dipping, it adds an enticing twist.
-
Sweet Potato Fries: These crispy, lightly salted sweet potato fries offer a deliciously sweet counterbalance to the savory chicken. The vibrant color and unique flavor make them a satisfying addition to your spread.
-
Garlic Breadsticks: Soft, buttery garlic breadsticks add a comforting element, perfect for soaking up any leftover sauces from your chicken fingers. Their aromatic flavor complements the dish beautifully!
-
Vegetable Medley: Roasted or steamed vegetables introduce a healthy, colorful touch that balances the richness of the chicken. Their natural sweetness enhances the meal’s overall flavor profile.
-
Sparkling Lemonade: A refreshing, fizzy lemonade perks up the meal, cutting through the richness of the fried chicken fingers. Its bright flavor adds a festive touch to your dining experience.
-
Chocolate Chip Cookies: End your feast on a sweet note with warm chocolate chip cookies. Their gooey chocolate contrasts with the savory chicken fingers, making for a perfectly satisfying conclusion.
Feel free to mix and match these ideas to create an unforgettable meal that celebrates the joy of homemade food!
How to Store and Freeze Ultimate Crispy Chicken Fingers
Room Temperature: Chicken fingers can be left out for up to 2 hours after cooking, but for safety, it’s best to refrigerate them promptly.
Fridge: Store leftover chicken fingers in an airtight container for up to 3 days. Ensure they are completely cooled before sealing to maintain crispiness.
Freezer: Freeze cooked chicken fingers in a single layer on a baking sheet, then transfer to an airtight container or freezer bag. They can be stored for up to 2 months.
Reheating: To reheat, place frozen chicken fingers directly in the oven at 375°F (190°C) for 15-20 minutes, or until heated through and crispy for the best texture.
Ultimate Crispy Chicken Fingers Variations
Get ready to customize your chicken fingers into something uniquely delicious that everyone will love!
- Dairy-Free: Substitute regular breadcrumbs with crushed cornflakes or gluten-free breadcrumbs to maintain crispiness without dairy.
- Cheesy Delight: Mix grated Parmesan into the breadcrumbs for a savory flavor twist; it adds a rich, cheesy finish that will enhance every bite.
- Spicy Kick: Add cayenne pepper or hot sauce to your egg mixture for some heat; it’s an excellent way to sizzle things up for spice lovers!
- Herbed Wonder: Incorporate fresh or dried herbs like parsley or oregano into the breadcrumb mixture. It elevates the aroma and freshness, making each bite incredibly flavorful.
- Indian-inspired: Use curry powder or garam masala in the flour for an exotic spin; these spices bring a vibrant twist that’s hard to resist.
- Zesty Citrus: Add lemon zest to the breadcrumb mixture for a bright, zesty flavor. This twist adds a refreshing note that complements the chicken beautifully.
- Sweet & Savory: Drizzle honey or maple syrup over the cooked chicken fingers for a sweet contrast. Pair it with spicy dipping sauce for that perfect sweet-savory experience!
- Smoky BBQ: Prior to coating, marinate chicken strips in your favorite BBQ sauce to infuse a smoky flavor. It’s a delightful twist that will make these fingers irresistible!
Make Ahead Options
These Ultimate Crispy Chicken Fingers are perfect for meal prep and busy weeknights! You can bread the chicken strips and refrigerate them for up to 24 hours before cooking, ensuring they’re ready to fry or bake when you are. Simply set up your breading station, coat the chicken, and place them on a baking sheet lined with parchment paper. Cover tightly with plastic wrap to maintain their freshness and prevent them from sticking together. When you’re ready to serve, just cook them according to the instructions—frying or baking—and enjoy restaurant-quality results with minimal effort. This make-ahead option allows you to savor homemade comfort food without the rush!

Ultimate Crispy Chicken Fingers Recipe FAQs
How do I choose ripe and fresh chicken breasts?
When selecting chicken breasts, look for a pink color without any dark spots or a slimy texture. Fresh chicken should have a pleasant smell, while the packaging should be intact. I often recommend buying organic or free-range chicken for optimal flavor and quality.
What’s the best way to store leftover chicken fingers?
Store your leftover chicken fingers in an airtight container in the refrigerator for up to 3 days. Ensure they are completely cooled before sealing them to maintain their crispiness. For reheating, simply pop them in the oven at 375°F for about 10-12 minutes to regain that delightful crunch.
Can I freeze crispy chicken fingers?
Absolutely! To freeze, first arrange the cooked chicken fingers in a single layer on a baking sheet. Freeze them for 2-3 hours until solid, then transfer to an airtight container or freezer bag. They can be stored for up to 2 months. For the best results, reheat frozen chicken fingers directly in the oven at 375°F for 15-20 minutes until they’re hot and crispy again.
What if my chicken fingers turn out soggy?
If your chicken fingers end up soggy, it’s often due to overcrowding while frying or not allowing them to rest on paper towels after cooking. To avoid this next time, ensure you’re frying in batches, keeping each piece spaced out to allow steam to escape. Also, resting them on paper towels helps absorb excess oil, ensuring that crispy outer layer you desire.
Are these chicken fingers safe for kids?
Yes, these Ultimate Crispy Chicken Fingers are great for kids! They are free from any allergens commonly found in fast food and can be made with minimal seasoning to suit young palates. Always check for allergies, especially if you choose to add extras like cheese or spices.
Can I make these chicken fingers healthier?
Certainly! To make them healthier, consider baking instead of frying and using whole wheat breadcrumbs for added fiber. You can also opt for skinless chicken breasts and use olive oil to fry for less saturated fat. Additionally, serving with a homemade yogurt dip instead of creamy sauces can further enhance the nutritional profile.
Ultimate Crispy Chicken Fingers: The Best Homemade Delight
Equipment
- Skillet
- Baking sheet
- Bowls
- measuring cups
- Cooking Thermometer
Ingredients
For the Chicken Fingers
- 2 lbs Boneless, Skinless Chicken Breasts Cut into strips
- 1 cup All-Purpose Flour Sifted for lighter texture
- 2 large Eggs Beaten
- 1 cup Breadcrumbs Panko preferred for extra crunch
- 1 teaspoon Salt Adjust to taste
- 1 teaspoon Pepper Adjust to taste
- 1 teaspoon Garlic Powder Increase if desired
- 1 teaspoon Paprika Smoked paprika for extra flavor
For Frying/Baking
- 1 cup Cooking Oil Olive oil recommended
Instructions
Cooking Instructions
- Begin by cutting the boneless, skinless chicken breasts into strips about 1 inch wide.
- Gather three bowls. Fill one with seasoned flour, the second with two beaten eggs, and the third with seasoned breadcrumbs.
- Take each chicken strip and dip it into the flour, then the egg, and finally coat it with breadcrumbs.
- For frying, heat oil in a skillet over medium-high heat and fry each strip for about 3-4 minutes per side until golden brown.
- For baking, preheat the oven to 400°F (200°C), arrange chicken fingers on a baking sheet and bake for 20-25 minutes.
- Place the cooked chicken fingers on paper towels to drain excess oil and serve warm with dipping sauces.
Notes

Leave a Comment